
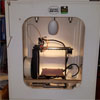
I had my 1/8" PEI sheet laminated to the bed and I had such a horribly uneven surface that I just flipped the glass over and forgot about it. One day I got bored and removed the sheet and instead of throwing it out I got bigger clips, gave the surface a good wet-sanding with 1000 grit and gave it a go, and my prints are awesome now. PETG sticks especially well, and I have no issues with the surface lifting. I recently did a print that was edge to edge so I went from 6 clips to 8 to make sure it was as level as possible, and zero problems.
The BEST part about it, if you ignore the "zero hassle" prints part, is that when your print is done, you dont have to deal with the double edged sword of having good bed adhesion, where you have a hell of a time removing them after a print, because you simply unclip the pei, flex it, and the print comes right off.
Its Amazing.
Honestly the best mod I've done to my M2 next to the hot end upgrade and stepper dampers.
PEI Bed Surface
Re: PEI Bed Surface
Wow great idea and such a simple solution. My PEI is stuck to the bed pretty well but if I have problems., this is the way I will go. Thanks for posting.Farr0wn3d wrote:I had my 1/8" PEI sheet laminated to the bed and I had such a horribly uneven surface that I just flipped the glass over and forgot about it. One day I got bored and removed the sheet and instead of throwing it out I got bigger clips, gave the surface a good wet-sanding with 1000 grit and gave it a go, and my prints are awesome now. PETG sticks especially well, and I have no issues with the surface lifting. I recently did a print that was edge to edge so I went from 6 clips to 8 to make sure it was as level as possible, and zero problems.
The BEST part about it, if you ignore the "zero hassle" prints part, is that when your print is done, you dont have to deal with the double edged sword of having good bed adhesion, where you have a hell of a time removing them after a print, because you simply unclip the pei, flex it, and the print comes right off.
Its Amazing.
Honestly the best mod I've done to my M2 next to the hot end upgrade and stepper dampers.
Retired Master Electrician, Commercial HVAC/R,CNC Router
-
creativedex
- Posts: 28
- Joined: Thu Oct 15, 2015 8:32 am
Re: PEI Bed Surface
Farr0wn3d wrote:I had my 1/8" PEI sheet laminated to the bed and I had such a horribly uneven surface that I just flipped the glass over and forgot about it. One day I got bored and removed the sheet and instead of throwing it out I got bigger clips, gave the surface a good wet-sanding with 1000 grit and gave it a go, and my prints are awesome now. PETG sticks especially well, and I have no issues with the surface lifting. I recently did a print that was edge to edge so I went from 6 clips to 8 to make sure it was as level as possible, and zero problems.
The BEST part about it, if you ignore the "zero hassle" prints part, is that when your print is done, you dont have to deal with the double edged sword of having good bed adhesion, where you have a hell of a time removing them after a print, because you simply unclip the pei, flex it, and the print comes right off.
Its Amazing.
Honestly the best mod I've done to my M2 next to the hot end upgrade and stepper dampers.
Thanks for your input thats exactly what i was wanting to try... I found a sheet of u2300 im going to try... its .25in thick with 30% fiberglass fill hoping it works instead of using glass.
-
pyronaught
- Posts: 684
- Joined: Mon Dec 01, 2014 8:24 pm
Re: PEI Bed Surface
From what I've read it looks like you have to clean the PEI with alcohol between each print. If this is true, it would completely nullify the advantage of not having to apply a surface treatment between prints. Cleaning with alcohol would be just like having to wipe ABS slurry on a kapton sheet. For me the only benefit of PEI would be for starting the next print without having to do anything to the surface after the previous print, but it doesn't appear to be that way.
I use 5mil solid kapton sheets with ABS slurry and ABS parts stick amazingly well at only 70deg plate temp while still being removable at 40 to 45 deg, so that really narrows the range you have to wait for heating and cooling. The amount of ABS dissolved into the acetone can be quite tiny and still work well. Given that PEI has all these attachment problems on top of needing to be sanded once in a while and having to run the plate at higher temps, it wouldn't be worth putting up with that unless you could run one part after another without having to touch the plate.
I use 5mil solid kapton sheets with ABS slurry and ABS parts stick amazingly well at only 70deg plate temp while still being removable at 40 to 45 deg, so that really narrows the range you have to wait for heating and cooling. The amount of ABS dissolved into the acetone can be quite tiny and still work well. Given that PEI has all these attachment problems on top of needing to be sanded once in a while and having to run the plate at higher temps, it wouldn't be worth putting up with that unless you could run one part after another without having to touch the plate.
Experience is what you get when you didn't get what you wanted.
Re: PEI Bed Surface
I've managed to get my hands on a remnant piece of.25" 2300 the plan is to use it like i do the mic6 boro or zebra plate and just clamp it to the hbp. I've not gotten around to cutting it to size yet, i should end up with two 8x10 pieces. i did price out 1 custom cut 8x10 piece of .25" 2300 they wanted 110 bucks. so not sure its very economical.
M2 - MKS SBase w Smoothieware, GLCD, 24v, Upg Z & extruder stepper - IR bed leveling, Astrosyn dampers X/Y/Z, MIC 6, Zebra, PEI, & glass Build Plates - E3D, V3B Hotends, & more - many other 3d printers - production printing.
Re: PEI Bed Surface
i have a variation on what ed is doing. i am using an ir sensor (would technically work with a magnetic probe or a switch) to sense both the z=0 off the bed and to then also auto tram the bed.ednisley wrote:
The general idea is to have the Z-axis switch sense the top of the platform, rather than a bolt off to the side that requires constant putzing to adjust.
never needs adjusting.
M2 - MKS SBase w Smoothieware, GLCD, 24v, Upg Z & extruder stepper - IR bed leveling, Astrosyn dampers X/Y/Z, MIC 6, Zebra, PEI, & glass Build Plates - E3D, V3B Hotends, & more - many other 3d printers - production printing.
-
pyronaught
- Posts: 684
- Joined: Mon Dec 01, 2014 8:24 pm
Re: PEI Bed Surface
So is it true that PEI must be wiped down with alcohol between every print? Does the part leave some kind of film behind that prevents the next part from sticking? I don't see what the alcohol would be removing.
Experience is what you get when you didn't get what you wanted.
Re: PEI Bed Surface
No, you don't need to wipe it with alcohol between prints, but it does need to be clean. I normally knock parts off my bed with a scraper, but if I accidentally touch the bed with my fingers I'll usually give it a wipe, just in case.
cheers,
c
cheers,
c

Re: PEI Bed Surface
I've only had to give it an alcohol cleaning a couple of times, and that was when i'd accidentally brushed it with an oily fingertip. (Simultaneous snacking on Cheetos and print removal is not recommended.) 
-
pyronaught
- Posts: 684
- Joined: Mon Dec 01, 2014 8:24 pm
Re: PEI Bed Surface
I'm going to have to try PEI then. The idea of being able to automate removing one part and starting the next is intriguing, and a build plate that doesn't require prepping between parts would be the first step in that direction.
Experience is what you get when you didn't get what you wanted.