Booger control

General discussion topics
Post Reply
bignordique
Posts: 32
Joined: Wed Jun 10, 2015 6:44 pm

Booger control

Post by bignordique » Fri Oct 23, 2015 11:13 pm

I am printing a large number of what look like milk cartons with the tops cut off out of transparent PETg.

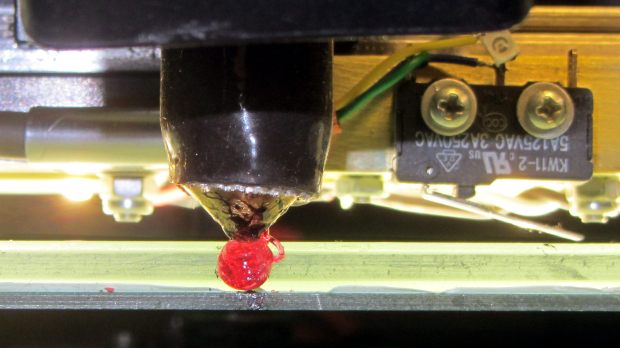
For my application the appearance of the bottom (what's printed on the platen) is important. Any unintended blobs or charred detritus makes the print unusable.

A further problem is I'm using a 0.5 mm nozzle to reduce print time and improve the clarity of the print. Larger nozzles tend to drool/ooze more.

If I sit here while the print it starting up and perform booger control, I can usually get a good result. But that's time consuming. I'd rather be able to hit the start button, go have dinner, come back and take the piece off, hit the start button again and leave.

Things I've done so far:
  • I've tried retracting the filament at the end of the print as a means of reducing the drool.
    I've changed the startup code such that the HBP comes up to temp before I turn on the extruder heater. That way as soon as the extruder comes up to temp it goes. Minimizing drool time.
These measures have been moderately successful, but I still get some boogers emanating from the drool time. Usually they get wiped off on the skirt.

I could increase the number of skirt loops, but that's a statistics game that I will sometimes lose.

Anybody have any other ideas??

Thanks.

bignordique

User avatar
ednisley
Posts: 1188
Joined: Fri Apr 11, 2014 5:34 pm
Location: Halfway up the Hudson
Contact:

Re: Booger control

Post by ednisley » Sat Oct 24, 2015 12:38 am

bignordique wrote:Usually they get wiped off on the skirt.
My startup code puts the nozzle exactly at the front edge of the platform, waits for it to finish heating, primes the hot end, slices the blob off on the platform, sleazes the rest of the gunk off, then zips off to the skirt. Haven't had any problems with crud making it to the object, so maybe it'll suffice for you.

This walkthrough should give you the general idea:
http://softsolder.com/2015/03/31/makerg ... -whatever/

Image

CAUTION: My setup has XY=0 in the center of the platform, with Z=0 exactly at the top surface, and there are no corner brackets or clips in the way. Don't copy the G-Code directly into your startup!

Post Reply