V6 Upgrade

The place to discuss your hardware and software/firmware modifications...
User avatar
pyronaught
Posts: 684
Joined: Mon Dec 01, 2014 8:24 pm

V6 Upgrade

Post by pyronaught » Fri Apr 03, 2015 6:44 pm

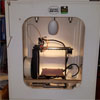
I know there's a giant thread on this already, but I figured I'd put this here so it doesn't get lost in that mountain of information. When the thermistor went bad in my original Vb3 I just went ahead and built the V6 kit I had on hand and replaced it. It seems that everyone is using a printed mount for these things, but I was wondering why not just use the minimal configuration from the original kit as seen below? I kind of like being able to see the extruder gear turning and also having less mass on the print head, plus it is very easy to remove the hot end if needed without having to unscrew anything. Was there a problem that the printed fan mount was used to solve? Granted there's no second fan to blow on the extrusion point here, but I never use PLA and can't think of any other scenario where I'd need that fan. I'd really rather just not be hauling it around if it never gets used.

The other thing I read about on this forum was the need to change out a temp table in the firmware. Since the thermistor was correctly reading ambient temperature as verified by the temp readout I have built into my chamber, I just went ahead and used it as-is. I don't have a way to verify the operating temps though, but it seems to print just like my former Vb3 did. Are there just slightly different temperature curves for the various thermistors, with the differences only showing up at the higher temp range?

It really just seems like the V6 is plug-and-play, working right out of the box without changing anything other than the Z-stop. I'm using the same print settings I was using on the Vb3 and getting the same results.
v6_hotend.jpg
v6_hotend.jpg (392.27 KiB) Viewed 12391 times
Experience is what you get when you didn't get what you wanted.

User avatar
insta
Posts: 2007
Joined: Tue Sep 16, 2014 3:59 am

Re: V6 Upgrade

Post by insta » Fri Apr 03, 2015 8:10 pm

Does it just pop straight into the stock hotend mount?
Custom 3D printing for you or your business -- quote [at] pingring.org

User avatar
pyronaught
Posts: 684
Joined: Mon Dec 01, 2014 8:24 pm

Re: V6 Upgrade

Post by pyronaught » Fri Apr 03, 2015 8:54 pm

insta wrote:Does it just pop straight into the stock hotend mount?
Yep, it just slides right in with the same fit as the original. That's the mount that came with my M2, I never printed a replacement.
Experience is what you get when you didn't get what you wanted.

User avatar
jimc
Posts: 2888
Joined: Wed Apr 09, 2014 11:30 pm
Location: mullica, nj
Contact:

Re: V6 Upgrade

Post by jimc » Sat Apr 04, 2015 1:17 am

yes you need to change the firmware to use the #5 thermistor table. it wont be accurate of you dont. i am like you and dont like to have the bed fan hanging there if im not going to use it which was why i designed my mount setup so the fan just snaps on and off. attach it for prints you need it for. you can also still see the drive gear. that was necessary for me as well especially for ninjaflex. you can see when you have feed issues when you loading the filament. seems kinda strange that it fit the stock filament drive though. the v6 has the fitting on the top. the stock drive doesnt have a notch for clearance right there

User avatar
pyronaught
Posts: 684
Joined: Mon Dec 01, 2014 8:24 pm

Re: V6 Upgrade

Post by pyronaught » Sat Apr 04, 2015 3:32 am

There's enough gap above the v6 head that the connector on top was able to fit. The band around the top of the v6 I have is not as thick as the one on the vb3, which results in a space at the top which exactly fits the connector on top. Perhaps they changed the dimensions on the v6 slightly to allow this?
Experience is what you get when you didn't get what you wanted.

User avatar
jimc
Posts: 2888
Joined: Wed Apr 09, 2014 11:30 pm
Location: mullica, nj
Contact:

Re: V6 Upgrade

Post by jimc » Sat Apr 04, 2015 3:37 am

hmmm, without the hotend supported around the top edge does it wiggle at all or seem loose if you try to move it back and forth? doesnt seem like it would be solid and tight in there but i have never tried it.

User avatar
pyronaught
Posts: 684
Joined: Mon Dec 01, 2014 8:24 pm

Re: V6 Upgrade

Post by pyronaught » Sat Apr 04, 2015 5:22 am

It seems pretty tight. The black barbed connector thing is wedged against the top and must be large enough in diameter to keep it from wobbling. I'm getting clean prints with it like this and no gunk building up on the nozzle. I like the tiny fan on these things, you hardly notice that there's even a fan there.

I keep reading where people are saying the two fans are wired in series with a 12 volt drop across each one. This can not be correct otherwise when one fan is unplugged the other would not run. Not only that, but the software would not be able to turn one off without turning both off. They are not electrically wired in series, the 24 volt is being converted to 12 by some other means. Perhaps the power supply is one of the types that have +12v and -12v, which can be used to get both 12v and 24v.
Experience is what you get when you didn't get what you wanted.

User avatar
jimc
Posts: 2888
Joined: Wed Apr 09, 2014 11:30 pm
Location: mullica, nj
Contact:

Re: V6 Upgrade

Post by jimc » Sat Apr 04, 2015 5:24 am

no they are in series. they both run all the time. extruder fan and elec box.

User avatar
pyronaught
Posts: 684
Joined: Mon Dec 01, 2014 8:24 pm

Re: V6 Upgrade

Post by pyronaught » Sat Apr 04, 2015 4:01 pm

jimc wrote:no they are in series. they both run all the time. extruder fan and elec box.
Ah, I was thinking extruder fan and bed fan. So is the bed fan 24v then?
Experience is what you get when you didn't get what you wanted.

User avatar
jimc
Posts: 2888
Joined: Wed Apr 09, 2014 11:30 pm
Location: mullica, nj
Contact:

Re: V6 Upgrade

Post by jimc » Sat Apr 04, 2015 4:29 pm

Yes the bed fan is 24

Post Reply